DIY wedding fleurs: How to make organza flowers and bouquets
 |
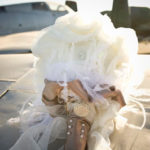
| My gorgeous bouquet. Photographed by Beth Baugher at True Love Photo. Blinged-out flowers by me. Artistry by my lovely mother. Button from my great-grandmother and “virginity pin” from my grandmother. |
Confession: Fresh cut flowers make me sad. Although I adore them and indulge every so often, their ephemeral nature distresses me somewhat. How can something so beautiful and often so costly as a bouquet turn into a wilty, crunchy mess after only a few days? This mindset may be why I am prone to dry almost every bouquet I buy, and also why I was hesitant to use fresh flowers for our wedding last year. When planning, the thought of organizing flowers stressed me out because 1. They did not fit into the budget and 2. Given our July wedding, I knew I would end up with dead florals by the end of the day. (Truth: It was 103 on our wedding day!)
After perusing the internet for other possibilities–non-flower options, live plants, etc.–I ran across this post by Anna Alter at Painting Bunnies and the idea was born. Organza flowers. Organza bouquets. Flowers that would NEVER die!!
Making the flowers is fairly simple, but I cannot lie, extremely time consuming. What I learned early on about DIY projects: What you make up for in cost savings, you pay for in time. Still, with seven bridesmaids, seven groomsmen, three wedding fairy princess people, two junior ushers, a flower girl, a ring bearer, 130+ guests and separate ceremony and reception sites to decorate, it was the right choice for me. A piece of advice though: Start early. Start early. Start early. Do not procrastinate and assemble your bouquets a couple days before the wedding. Ah hem.
Here’s what you do…
 |
| Assembly line at my mom’s house. All hail my mom and sister Emily for excellence in flower production. These ladies helped make more than 1,000 fleurs! Photo by Ann Poffenberger. |
First, gather supplies: Organza, matching thread, good needles, excellent scissors, candles and beads. The first step is choosing fabric. I shopped with my best friend Shannon and also with my mother after an unsuccessful trip to Joann’s* Fabrics where I couldn’t decide what shades were “right.” I started out picking up a few swatches of fabric to get started and truthfully, to see how difficult it was to sew. (If you aren’t sure, try remnants or pieces of fabric, which are cheaper.)
For each flower, I used at least two types and/or shades of organza for depth. I alternated between shimmery (expensive) organza and matte “bubble” organza, which was more economical. I’ve seen similar flowers with other fabrics such as netting or tulle, but it wasn’t in the vision for me.
 |
| My lovely Marm at my flower making party! (Tip: calling slave labor a “party” does not fool the minions. Food helps though.) |
Tip: Once you choose your colors, especially if they’re bright like mine, buy up ALL the fabric available. I bought during prom season and the bolts were one-time only orders. You might also want to buy all at once, if possible, so that there aren’t differences in dye lots. (This wasn’t a problem for me because I took a snow flake approach: Every flower is unique and different. ha!)
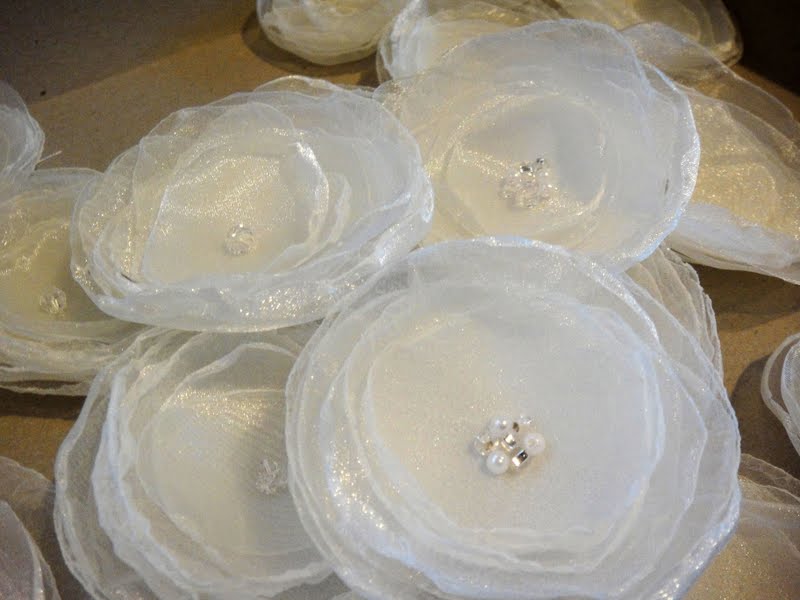
I chose inexpensive color-coordinating glass beads for the majority of flowers and used swarovski crystals and glass beads for my bouquet.
Do not forget coupons to retailers like Michael’s and JoAnn’s. Scour the local papers, make friends with people in other suburbs, and note most coupons are interchangeable between the two stores. Word to the wise: Martha Stewart’s magazine also runs a 15% off total purchase coupon to Michael’s.
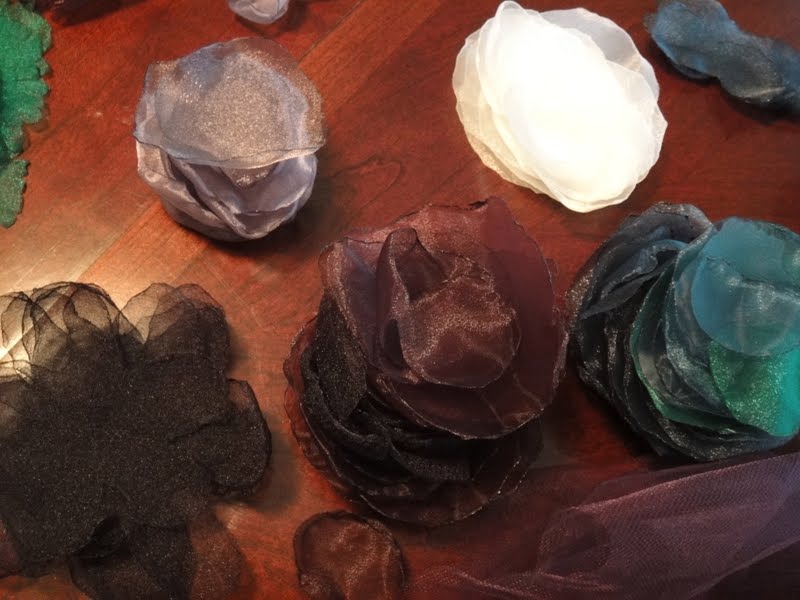 |
| After trial and error, I recommend keeping the colors separated during the cutting and singing steps. It will save you time sorting later, I swear! |
Second, cut, cut, cut. Again running with the snowflake approach, the second step is to cut the fabric into concentric circles. At first I tried to be Type A about it, making everything uniform, until I realized that once you singe the edges, the mistakes don’t matter. Just vary the sizes according to your purposes, going for variety of large to small. I must have logged a thousand hours of TV cutting petals in the months prior to the wedding. At this point, you will understand why I said excellent scissors in the list of supplies. Sharp sheers with a comfortable grip are the priority.
Tip: I tried to vary shapes for different styles of flowers (see bottom left of the photo at right), but I found it cumbersome to cut and burn. You can definitely make different shapes though. See here for a tutorial, and play around a bit.

Third, burn ’em, baby. Gather your petals and and candles and find a marathon on TV. For me, it was Criminal Minds (had to balance out the wedding crazy, you know?). Next, simply singe the edges of the flowers to your desired level of edge curling. By singe, I mean hold the petal to the flame, turning it round to melt the edge of the fabric. This happens quite quickly, so take care not to hold the fabric too close to the flame or for too long. I lost many a good petals to the fire!
I did the majority of my singing on the couch and quickly wound up with an aching back and arm from leaning onto the coffee table. To develop a more ergonomic (but slightly precarious) burning set-up, I put my candle on a jelly roll pan and set it on my lap.

Tip: I found cheap, wide, unscented candles to work best. When burning, watch out for draft-causers like ceiling fans or air conditioners. Flickering flames will give you an uneven singe.
Fourth, stack and sew. To assemble the fleurs, simply make stacks of petals, stitch a few times and finish with a bead or two or three. I played around with different color combinations, shapes, thicknesses, sizes, etc. The best part? If one looks wonky, simply remove the stitching and start over!
For the majority of flowers, I used two-three beads for each center. I added extra bead bling to my bouquet as you see below.
Tip: For a cleaner look, insert the needle a couple petals into the stack (instead of directly from the bottom) to hide the knot. As you stitch back, run the needle all the way through the stack to grab the last two petals. (Note: I have no idea if that makes any sense!)
Fifth, assemble and decorate. Part of the trouble I had was trying to get the flowers into usable form, especially in the bouquet realm. Through a lot of trial and errors, and a lot of hard work on my mom’s part, we figured out how to transform 1,000+ fleurs into four barrettes, three wrist corsages, 9 bouquets, 13 boutonnieres and 16 wreaths. Whew.
 |
| 1,000+ flowers! Again, thank you mom and Emily!! Photo by Ann Poffenberger. |
 |
| For assembly, color piles work best. Photo by Ann Poffenberger. |
 |
| At this point, I should mention you might need a hot glue gun. Photo by Ann Poffenberger. |
 |
| Bouquet prototype 1. Eventually we purchased small foam balls, covered them in fabric and hot-glued the flowers to the fabric. For the “stems,” we glued foam cones to the bottom of the flower-covered balls, and mom shaved the cones to be hand-sized before covering those in fabric, too. Needless to say, we lived at Michael’s. Start early on these people, start early. Photo by Ann Poffenberger. |
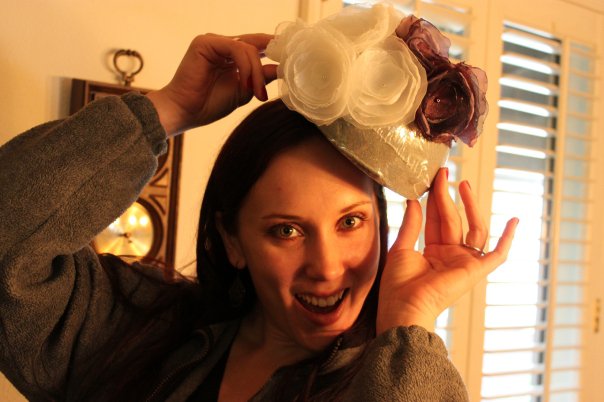 |
| Working the foam hat option. Photo by Ann Poffenberger. |
 |
| Prototype 2.7 was slightly lollipop-esque until mom added ribbons and flared bits around the bottom. I found choosing ribbons and bits absolutely daunting. Delegation is a very good thing. Photo by Ann Poffenberger. |
 |
| My fav! Photo by Ann Poffenberger. |
 |
| If you couldn’t tell, we did peacock colors. Photo by Beth Baugher. |
 |
| Boots were simply pinned-on flowers. Easssssy. Photo by Beth Baugher. |
 |
| I have no idea how my mom made the wrist corsages, but there’s one in the middle of the photo modeled by my lovely mother-in-law, M-5. Photo by Beth Baugher. |
 |
| Gorgeous Kristi rocking the bouquet. Fun fact, Kristi’s going to be a mama soon! Photo by Beth Baugher. |
 |
| Extra petals were scattered on tables as extra decoration. Photographed by Beth Baugher at True Love Photo |
 |
| Wreaths were composed of fabric-covered foam circles onto which we hot-glued flowers. Because the colors were so vibrant, we stuck to blues and greens for the bouquets and boots, and used all of the purple for the wreaths. Along the aisles, the wreaths alternated blue/green and solid purple. Photographed by Beth Baugher at True Love Photo |
 |
| Cutest ring bear EVER. Note the fleurs sewed onto an old throw pillow. Photographed by Beth Baugher at True Love Photo |
One of these days, I’ll open an Etsy shop with cute hair accessories. Until then…
Questions? Email me: bluestmuse(at)gmail(dot)com
xoxo,
Shawna
*Is there some sort of sewer’s club I’m not aware of? I always feel like an outsider at that damn fabric counter!